Check to see that the header images are installed correctly. Navigate to C:\Program Files\Alphapos\Aura. In the Aura directory, there should be an Images folder. If the folder does not exist, you need to create it.
Inside the Images folder, there should be two files called HEADER.BMP and HEADER.TMB (this is needed for Online ordering header). If the files are named incorrectly, or do not have the correct extensions, the header image will not print. If the images are not there, you will need to download new header files. See the section below on Updating Headers to see how this is done.
Open Invoicing and click Settings > Specific Computer > Printer Settings. Check to see that the option Print Invoice Logos is ticked. If it is not, no image files will print.
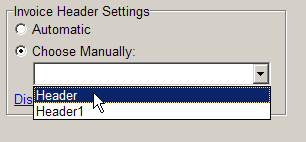
Combo Store/ Multiple Header SetupFor combo stores running version 6.3.19.0 and up, you can add multiple header files named header(.bmp/tmb), header1, header2, etc. This is correct as it allows for different headers to print for each store in the combo. You can specify which image file prints to this till by clicking Choose Manually under Invoice Header Settings, and selecting the correct header file. Click Display header image that will be used to make sure you've selected the right one. The list is populated by looking at all the files in the Aura\Images folder named header*.bmp. In Automatic mode the header file will be assigned to each till depending on the following rules:
|
Where can Header Artwork Be Downloaded?
Each brand has their own unique and confidential URL. Our helpdesk can share it with you.
Scroll to the Software for Current Events section and click the correct header. Depending on your browser, take the following action:
Internet Explorer: Click "Run" to run the file immediately after download.
Firefox: Click Save File. Click the file on the downloads list to open it after it completes downloading.1. 2.Chrome: The download will begin automatically on a bar at the bottom of the page. Click on the file once the download completes.
When the file opens, click Run. Click Extract to automatically extract the header files to the new location.
The header will now be updated. Print an invoice to check that the new image prints correctly.


